Have you ever gazed at a perfectly manicured hand, admiring the elegant curve of an almond nail or the bold statement of a coffin shape, and wondered how to achieve that same level of polished perfection for yourself? The world of fingernail shapes is far more intricate and impactful than a simple file and clip; it’s an art form, a science, and a powerful tool for self-expression that can dramatically alter the perception of your hands. But what exactly are fingernail shapes, why do they hold such significance in beauty and personal style, and what real-world problems do they solve for individuals seeking to enhance their appearance, express their personality, or even improve the practical durability of their nails?
At its essence, a fingernail shape refers to the contour of the free edge of your nail, the part that extends beyond your fingertip. It’s the deliberate sculpting of this edge, along with the careful consideration of your natural nail bed and finger anatomy, that creates the desired aesthetic. This seemingly small detail matters immensely because it can visually elongate or shorten fingers, balance hand proportions, convey a sense of elegance, edginess, or classic charm, and even influence the strength and resilience of your nails against daily wear and tear. For many, the challenge lies in navigating the vast array of options – from the timeless round to the dramatic stiletto – and understanding which shape will truly flatter their unique hands and align with their lifestyle. This guide is designed to be your comprehensive resource, a knowledgeable expert walking you through every facet of fingernail shaping. We’ll explore the anatomy of the nail, meticulously detail each popular shape, provide a strategic framework for choosing your ideal match, unveil the essential tools and techniques for professional-level results, delve into the world of extensions, uncover the fascinating psychology behind nail aesthetics, and offer practical solutions to common shaping dilemmas. Prepare to unlock the secrets to truly sculpted perfection, transforming your hands into a canvas of confidence and style.
The Anatomy of Fingernail Shapes: Beyond the Basic Trim
Before diving into the myriad of aesthetic possibilities, a foundational understanding of the nail’s anatomy is crucial. The shape of your fingernail isn’t just about how you file the tip; it’s intrinsically linked to the natural contours of your nail bed, the underlying skin that supports the nail plate. Ignoring this fundamental relationship is a common mistake that can lead to unnatural-looking results or even compromise nail health. Understanding the anatomy of fingernail shapes goes far beyond a basic trim; it’s about respecting the natural architecture of your hands.
The nail plate, the hard, visible part of your nail, rests on the nail bed. The shape of this nail bed – whether it’s naturally wide, narrow, long, or short – plays a significant role in determining which artificial or sculpted shapes will look most harmonious. For instance, a naturally wide nail bed might struggle to support a very narrow, pointed stiletto shape without looking disproportionate, whereas a long, slender nail bed might be perfectly suited for it. The free edge is the part of the nail plate that extends beyond the fingertip, and it’s this area that we manipulate to create different fingernail shapes.
The cuticle, the thin layer of skin at the base of the nail, and the lateral nail folds (the skin on the sides of the nail) also contribute to the overall appearance and health of your nails. Proper care of these areas, including gentle pushing back of the cuticles, ensures a clean canvas for shaping and prevents issues like hangnails that can detract from even the most perfectly sculpted tip.
When we talk about the “natural nail shape,” we’re often referring to the shape of your fingertip itself, or the way your nail naturally grows if left untrimmed. For many, this might be a slightly rounded or squarish shape that mirrors the natural curve of their finger. Sculpted nail shapes, on the other hand, are deliberate alterations to this natural growth, achieved through filing, clipping, and sometimes, the application of extensions like acrylics or gels. The goal is often to create an illusion – perhaps of longer fingers, more slender hands, or a bolder aesthetic.
Why does this matter? Because trying to force a shape that fundamentally clashes with your natural nail bed can lead to several problems. It can make the nails look awkward or disproportionate, create stress points where the nail is more prone to breaking or splitting, or simply be incredibly difficult to maintain. For example, forcing a sharp square shape on a naturally very rounded nail bed might result in corners that snag easily or look too abrupt. Conversely, trying to maintain a very pointed stiletto on a very short nail bed might require excessive reliance on extensions, which comes with its own set of maintenance and potential damage concerns.
A knowledgeable nail technician will always assess your natural nail bed, finger length, and overall hand shape before recommending fingernail shapes. They understand that the ideal shape is a synergy between your natural anatomy and your desired aesthetic. This foundational understanding allows for the creation of a truly bespoke nail look that not only appears beautiful but also feels comfortable and is sustainable for your nail health. It’s about working with your natural nail, not against it, to achieve sculpted perfection.
Decoding the Popular Fingernail Shapes: A Comprehensive Guide
The world of fingernail shapes is rich with variety, each offering a distinct aesthetic and practical considerations. Deciphering these options is the first step towards finding your perfect match. Let’s embark on a detailed exploration of the most popular fingernail shapes, understanding their unique characteristics, ideal pairings, and what they truly convey.
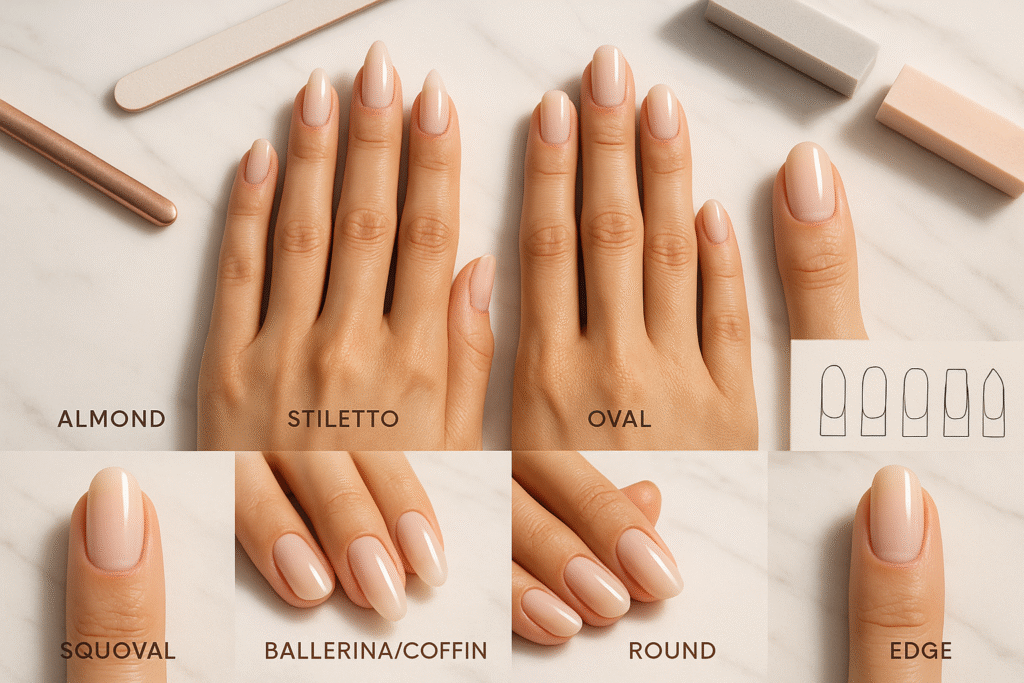
1. Round Fingernail Shape
Description: The Round fingernail shape is the epitome of natural elegance and simplicity. It mirrors the natural curve of the fingertip, with the free edge filed into a soft, symmetrical arc. There are no sharp corners or straight edges; it’s a smooth, continuous curve.
Ideal for: This shape is universally flattering and particularly ideal for those who prefer a low-maintenance, natural look. It’s excellent for short nails or individuals with wide nail beds, as the gentle curve can make fingers appear slightly longer and more slender without adding bulk. It’s also a fantastic choice for those whose nails are prone to breaking, as the lack of sharp corners minimizes snagging.
Pros:
- Low Maintenance: Requires minimal filing and is easy to maintain at home.
- Durability: Less prone to breaking or snagging due to the absence of corners.
- Natural Look: Blends seamlessly with the natural contours of the finger.
- Universal Flattery: Suits almost all finger and nail bed types.
- Practicality: Ideal for active individuals, healthcare professionals, or those who use their hands frequently.
Cons:
- Less Dramatic: Might not offer the bold statement some desire.
- Doesn’t Elongate Dramatically: While it can make wide fingers look a bit slimmer, it doesn’t create the same dramatic elongation as oval or almond shapes.
Styling Tips: The Round shape is versatile for all polish colors and nail art. It looks particularly chic with classic nudes, soft pastels, or vibrant solid colors. Minimalist designs, like a single stripe or a delicate dot, complement its simplicity.
Examples/Analogies: Think of the classic, polished look of a French manicure, or the neat, understated elegance favored by many professionals. It’s the “little black dress” of fingernail shapes – always appropriate, always chic.
2. Oval Fingernail Shape
Description: The Oval fingernail shape is a sophisticated and elongating option. It’s similar to the round shape but extends further, creating a more pronounced, egg-like curve that tapers slightly towards the tip. The sides of the nail are gently curved, mirroring the natural shape of the nail bed, before converging into a soft, rounded point at the free edge.
Ideal for: This shape is incredibly versatile and flattering for almost all finger types. It’s particularly beneficial for those with shorter or wider fingers, as the elongated curve creates a beautiful illusion of length and slenderness. It also works well for individuals who have naturally strong nails and a bit of length to work with.
Pros:
- Elongating Effect: Visually lengthens fingers and makes hands appear more graceful.
- Elegant & Feminine: Conveys a sense of sophistication and classic beauty.
- Stronger than Pointed Shapes: Less prone to breaking than stiletto or almond, as the tip is still rounded.
- Versatile: Suitable for both short and long nails, and a wide range of styles.
Cons:
- Requires Some Length: Needs a bit of free edge to achieve the distinct oval shape.
- Maintenance: Requires consistent filing to maintain the perfect curve.
Styling Tips: Oval nails are perfect for classic reds, deep jewel tones, and sophisticated nudes. They are also an excellent canvas for intricate nail art, delicate florals, or elegant negative space designs, as the elongated shape provides ample room.
Examples/Analogies: Imagine the timeless glamour of Hollywood stars from the golden age, or the refined elegance seen on runways. It’s the “classic pearl necklace” of fingernail shapes – understated yet undeniably luxurious.
3. Square Fingernail Shape
Description: The Square fingernail shape is bold, modern, and makes a strong statement. It features straight side walls and a perfectly straight, blunt free edge, creating a sharp, angular look. The corners are typically kept crisp and defined, forming a perfect 90-degree angle.
Ideal for: This shape is best suited for individuals with naturally long, slender fingers and narrow nail beds, as it can sometimes make shorter or wider fingers appear stubbier. It’s also a popular choice for those with strong, healthy nails, as the sharp corners can be prone to snagging if the nails are weak.
Pros:
- Modern & Edgy: Conveys a contemporary, strong, and confident aesthetic.
- Clean Lines: Provides a very neat and polished appearance.
- Great for Nail Art: The straight edge offers an excellent canvas for geometric designs, stripes, and bold color blocking.
- Perceived Strength: Looks sturdy and robust.
Cons:
- Prone to Snagging/Breaking: The sharp corners can catch on things, leading to chips or breaks, especially if nails are weak.
- Can Shorten Fingers: May make fingers appear shorter or wider, particularly on those with naturally short or wide digits.
- Higher Maintenance: Requires precise filing to maintain crisp corners.
Styling Tips: Square nails look fantastic with bold, opaque colors, dark shades, and vibrant neons. They are the perfect backdrop for graphic nail art, abstract designs, or a classic French manicure with a modern twist.
Examples/Analogies: Think of minimalist architecture or a perfectly tailored suit – sharp, precise, and impactful. It’s the “power suit” of fingernail shapes.
4. Squoval Fingernail Shape
Description: The Squoval fingernail shape is a popular and practical hybrid, blending the strength of the square with the softness of the oval. It features straight side walls like the square, but the sharp corners are gently rounded off, creating a softer, more forgiving edge.
Ideal for: This shape is incredibly versatile and universally flattering, making it an excellent choice for almost anyone. It’s particularly ideal for those who like the look of square nails but find the sharp corners impractical or prone to breaking. It’s also great for individuals with wide nail beds or shorter fingers, as it offers a clean look without the shortening effect of a full square.
Pros:
- Durability: Much less prone to snagging and breaking than a pure square, thanks to the rounded corners.
- Universal Flattery: Suits most finger and nail bed types.
- Practicality: Combines the best of both worlds – the clean lines of a square with the wearability of a round/oval.
- Low Maintenance: Easier to maintain than a sharp square.
Cons:
- Less Dramatic: Might not offer the extreme statement of more angular or pointed shapes.
- Can Still Shorten Fingers Slightly: While better than a pure square, it still won’t elongate fingers as much as an oval or almond.
Styling Tips: Squoval nails are incredibly adaptable. They look great with any polish color, from nudes and pastels to bold and dark shades. They are a fantastic canvas for both classic and modern nail art, including French tips, ombre, and subtle glitter accents.
Examples/Analogies: It’s like a comfortable yet stylish pair of jeans – practical, versatile, and always a good choice. It’s the “everyday hero” of fingernail shapes.
5. Almond Fingernail Shape
Description: The Almond fingernail shape is elegant, graceful, and highly elongating. It features side walls that taper from the base to a soft, rounded point at the free edge, much like the shape of an almond nut. The curve is more pronounced than an oval, leading to a more defined, yet still soft, tip.
Ideal for: This shape is particularly flattering for those with shorter or wider fingers, as it creates a beautiful illusion of length and slenderness. It also works wonderfully for individuals with naturally strong nails, as it requires a bit of length to truly achieve the distinct almond silhouette.
Pros:
- Maximum Elongation: Visually lengthens fingers more dramatically than oval, creating a very elegant hand appearance.
- Feminine & Chic: Conveys sophistication, grace, and a high-fashion aesthetic.
- Less Prone to Snagging than Stiletto: The rounded tip makes it more practical than sharp points.
- Versatile for Nail Art: Provides an excellent elongated canvas for intricate designs.
Cons:
- Requires Significant Length: Difficult to achieve on very short nails without extensions.
- Can Be Prone to Breaking: While better than stiletto, the tapering still creates a weaker point than round or squoval.
- Maintenance: Requires consistent filing to maintain the perfect tapered curve.
Styling Tips: Almond nails are exquisite with sophisticated nudes, deep berry tones, classic reds, and metallic polishes. They are perfect for delicate lace designs, intricate florals, negative space art, or a glamorous French fade.
Examples/Analogies: Think of a ballet dancer’s graceful lines or the sleek design of a luxury car – elegant, refined, and effortlessly chic. It’s the “couture gown” of fingernail shapes.
6. Coffin/Ballerina Fingernail Shape
Description: The Coffin (or Ballerina) fingernail shape is a bold, dramatic, and highly fashionable choice. It features straight side walls that taper significantly towards the free edge, which is then filed flat and straight, creating a blunt, squared-off tip. The overall silhouette resembles a coffin or a ballerina slipper (hence the names).
Ideal for: This shape requires significant nail length, making it ideal for those with naturally long, strong nails or, more commonly, for individuals who opt for nail extensions (acrylics, gels) to achieve the necessary length and durability. It’s particularly flattering for those with longer, slender fingers, as it can sometimes make shorter fingers appear wider.
Pros:
- High Fashion & Trendy: A very popular choice among celebrities and fashion enthusiasts.
- Dramatic Statement: Makes a bold, edgy, and glamorous impression.
- Excellent Canvas for Art: The wide, flat tip provides ample space for elaborate nail art, 3D designs, and intricate embellishments.
- Elongating (with Length): Can make fingers appear longer if the nail itself is very long.
Cons:
- Requires Significant Length: Almost impossible to achieve on natural short nails.
- Prone to Snagging/Breaking: Despite the blunt tip, the sharp corners can still catch on things.
- High Maintenance: Requires regular filing to maintain the crisp, tapered shape and blunt tip.
- Less Practical: The length and shape can interfere with daily tasks.
Styling Tips: Coffin nails are perfect for bold, opaque colors, matte finishes, glitter, chrome effects, and intricate, maximalist nail art. They are often seen with elaborate designs, rhinestones, and French tips with a modern twist.
Examples/Analogies: Imagine the dramatic flair of a red-carpet celebrity or the edgy sophistication of a fashion icon. It’s the “statement piece” of fingernail shapes.
7. Stiletto Fingernail Shape
Description: The Stiletto fingernail shape is the most dramatic and edgy of all. It features side walls that taper sharply and continuously from the base to a very sharp, pointed tip, resembling the heel of a stiletto shoe. There are no rounded edges; it’s all about the fierce point.
Ideal for: This shape almost always requires nail extensions (acrylics or gels) to achieve the necessary length and strength, as natural nails are rarely strong enough to withstand the extreme tapering to a sharp point without breaking. It’s best suited for those who want to make a bold fashion statement and have very long, slender fingers.
Pros:
- Ultimate Drama & Edgy Appeal: Makes an incredibly bold and striking statement.
- Maximum Elongation: Creates the longest, most slender appearance for fingers.
- High Fashion: A favorite on runways and among trendsetters.
- Unique Canvas: Offers a unique, elongated canvas for artistic nail designs.
Cons:
- Extremely Prone to Breaking: The sharp point is very fragile and can break easily.
- Highly Impractical: Can interfere significantly with daily tasks like typing, picking up small objects, or even dressing.
- High Maintenance: Requires constant vigilance and professional upkeep if done with extensions.
- Almost Always Requires Extensions: Very difficult to achieve on natural nails.
Styling Tips: Stiletto nails are often paired with equally dramatic nail art – intricate patterns, bold colors, glitter, chrome, or even embedded jewels. They are a statement in themselves, often complementing avant-garde fashion.
Examples/Analogies: Think of a fierce supermodel on the runway or a powerful villain in a fantasy movie – sharp, commanding, and unforgettable. It’s the “avant-garde sculpture” of fingernail shapes.
8. Lipstick Fingernail Shape
Description: The Lipstick fingernail shape is a unique and unconventional choice, characterized by a slanted, asymmetrical free edge, resembling the angled tip of a fresh tube of lipstick. One side of the nail is longer than the other, creating a diagonal line across the tip.
Ideal for: This shape is for the truly adventurous and artistic individual who wants to make a distinct, quirky statement. It works best on medium to long nails, often achieved with extensions, to fully showcase the dramatic angle. It can add an unexpected edge to any hand.
Pros:
- Highly Unique & Artistic: Guarantees a standout, conversation-starting look.
- Edgy & Modern: Conveys a sense of individuality and fashion-forward thinking.
- Great for Abstract Art: The asymmetrical tip provides an interesting base for abstract or geometric nail art.
Cons:
- Impractical: The sharp, asymmetrical edge can snag easily and interfere with daily tasks.
- High Maintenance: Requires very precise filing to maintain the exact angle.
- Not Universally Flattering: Can look awkward on some hand shapes or if not executed perfectly.
- Prone to Breaking: The sharp angle creates a vulnerable point.
Styling Tips: Lipstick nails are often paired with bold, contrasting colors, graphic lines, or minimalist designs that emphasize the unique angle. They are a statement on their own, often chosen by those who embrace unconventional beauty.
Examples/Analogies: Imagine a piece of modern art or an architectural marvel with unexpected angles – daring, unconventional, and thought-provoking. It’s the “rebel” of fingernail shapes.
9. Flare/Duck Fingernail Shape
Description: The Flare, or “Duck,” fingernail shape is characterized by a free edge that widens significantly as it extends beyond the fingertip, creating a flared, fan-like appearance. The tip is often squared off or slightly rounded, but the defining feature is the dramatic outward curve of the sides.
Ideal for: This is a niche, highly specific aesthetic choice, often associated with certain subcultures or highly stylized fashion. It almost exclusively requires nail extensions to achieve the pronounced flare, as natural nails rarely grow with such a dramatic outward curve. It’s for individuals who prioritize a unique, attention-grabbing look over practicality.
Pros:
- Extremely Unique & Bold: Guarantees a highly distinctive and attention-grabbing appearance.
- Large Canvas for Art: The wide tip provides an expansive surface for elaborate 3D nail art, charms, and intricate designs.
- Statement Piece: A true fashion statement for those who dare to be different.
Cons:
- Highly Impractical: The wide flare can significantly interfere with almost all daily tasks.
- Prone to Snagging/Breaking: The wide edges are very vulnerable to catching on things.
- Requires Extensive Extensions: Cannot be achieved on natural nails.
- Not Universally Flattering: Can make fingers appear very short and wide, and is generally considered a niche aesthetic.
- High Maintenance: Requires constant professional upkeep.
Styling Tips: Flare nails are often adorned with maximalist designs, bold colors, glitter, rhinestones, and elaborate 3D elements that take advantage of the expansive surface area.
Examples/Analogies: Think of a flamboyant costume or a highly stylized piece of conceptual art – designed purely for visual impact and dramatic effect. It’s the “avant-garde showpiece” of fingernail shapes.
The Art of Selection: Choosing the Perfect Fingernail Shape for You
With such a diverse palette of fingernail shapes available, the crucial next step is to select the one that truly resonates with you. This isn’t just about picking a shape you find aesthetically pleasing; it’s a strategic decision that considers your natural hand anatomy, lifestyle, personal style, and maintenance commitment. This section will guide you through a thoughtful selection process, helping you find a shape that not only looks stunning but also feels right for your everyday life.
1. Assess Your Hand and Finger Anatomy: The Foundation of Flattery
Think of your hands as having their own “face shape.” The most flattering fingernail shapes often complement your natural proportions.
- Finger Length:
- Short Fingers: Shapes that create an illusion of length are your best friends. Oval, Almond, and even a slightly elongated Round shape can make short fingers appear longer and more slender. Avoid very short Square or Flare shapes, which can make fingers look stubbier.
- Long Fingers: You have more flexibility! Most shapes will look good. Square and Coffin shapes can emphasize length, while Oval and Almond will enhance elegance. Stiletto can create dramatic impact.
- Nail Bed Width:
- Wide Nail Beds: Shapes that narrow towards the tip, like Oval, Almond, Coffin, or even a well-executed Round, can make wide nail beds appear more slender. Squoval is also a good option as it softens the width. Avoid very wide Square or Flare shapes, which can exaggerate width.
- Narrow Nail Beds: You can pull off almost any shape. Square and Squoval can add a sense of strength, while Almond and Oval will maintain elegance.
- Overall Hand Size: Consider if your hands are naturally small or large. A very dramatic shape like Stiletto might overwhelm a very small hand, while a very subtle Round might get lost on a larger hand.
2. Lifestyle Considerations: Practicality Meets Polish
Your daily activities are a major determinant in choosing a sustainable nail shape.
- Profession:
- Healthcare/Food Service: Round or Squoval are ideal due to hygiene and practicality. Sharp or very long shapes can harbor germs or interfere with tasks.
- Manual Labor/Crafts: Shorter, durable shapes like Round or Squoval are best to prevent breaking and snagging.
- Office Work/Typing: Oval, Almond, or Squoval are generally good. Very long Coffin or Stiletto shapes can make typing difficult and uncomfortable.
- Musicians (especially string instruments): Often require very short, rounded nails to play effectively.
- Hobbies:
- Sports/Fitness: Short, durable shapes are paramount.
- Gardening/Crafting: Again, shorter, robust shapes are more practical.
- Playing Instruments: Consider how the nail shape might interfere with your instrument.
- Maintenance Commitment: Be honest about how much time you’re willing to dedicate.
- Low Maintenance: Round, Squoval.
- Medium Maintenance: Oval, Square (if you’re careful), Almond.
- High Maintenance: Coffin, Stiletto, Lipstick, Flare (especially with extensions, requiring frequent fills and careful handling).
3. Personal Style: Reflecting Your Aesthetic
Your nail shape is an extension of your personal brand.
- Classic & Timeless: Round, Oval, Squoval. These convey elegance, sophistication, and a polished demeanor.
- Modern & Edgy: Square, Coffin, Stiletto, Lipstick. These shapes make a statement, reflecting a bold, fashion-forward, or unconventional personality.
- Feminine & Graceful: Oval, Almond. These shapes enhance a delicate, refined, and romantic aesthetic.
- Minimalist: Short Round or Squoval. Clean lines and understated elegance.
- Glamorous & Dramatic: Coffin, Stiletto. For those who love to stand out and embrace maximalist beauty.
4. Trend vs. Timeless: Balancing Fashion with Flattery
While it’s fun to experiment with trends, remember that some fingernail shapes are inherently more timeless and universally flattering than others.
- Timeless: Round, Oval, Squoval. These shapes have endured for decades because they suit a wide range of hands and lifestyles.
- Trendy: Coffin, Stiletto, Lipstick, Flare. These are highly fashionable but might not suit everyone or every lifestyle. If you opt for a trendy shape, be prepared for more maintenance and consider if it truly complements your natural hand shape. It’s okay to embrace a trend, but ensure it’s a conscious choice.
5. Tools for Visualization and Decision-Making:
- Online Nail Visualizers/Apps: While less common for just shapes, some nail polish try-on apps (e.g., YouCam Nails, ManiMatch by OPI) might allow you to see how different shapes look on a simulated hand or your own. These are primarily for color, but can give a rough idea.
- Drawing/Sketching: A simple, effective method. Draw your hand or nail on paper and sketch different fingernail shapes over it.
- Temporary Shapes with a File: If your nails are long enough, you can gently file one nail into a rough version of a desired shape (e.g., a blunt square, then gently round the corners for squoval, then taper for almond) to see how it looks before committing to all ten.
- Consult Your Nail Technician: A professional nail technician is your best resource. They can assess your natural nail bed, finger length, and lifestyle, and provide expert recommendations. They can also create a test shape on one nail to help you visualize.
By thoughtfully considering these factors, you can move beyond simply admiring fingernail shapes and confidently choose the one that truly enhances your hands, aligns with your lifestyle, and reflects your unique personal style. It’s about making an informed decision that leads to lasting satisfaction and beautifully sculpted nails.
The Tools of the Trade: Shaping Your Fingernails Like a Pro
Achieving beautifully sculpted fingernail shapes at home requires more than just a vague idea of the desired look; it demands the right tools and precise techniques. Think of it as sculpting a miniature masterpiece – each stroke matters. This section will equip you with a comprehensive understanding of the essential tools and step-by-step methods to shape your fingernails like a seasoned professional, ensuring symmetry, strength, and a flawless finish.
Essential Tools for Shaping Fingernails:
- Nail Clippers:
- Straight-Edge Clippers: Ideal for square and squoval shapes, as they provide a clean, straight cut across the free edge.
- Curved-Edge Clippers: Better for round and oval shapes, following the natural curve of the nail.
- Quality Matters: Invest in sharp, good-quality clippers. Dull clippers can crush and damage the nail plate, leading to splits.
- Nail Files: This is your primary sculpting tool, and choosing the right type and grit is crucial.
- Emery Boards: Common and inexpensive. They come in various grits (coarseness).
- Coarse Grit (80-100): For artificial nails (acrylics/gels) or quickly reducing significant length on very strong natural nails. Avoid for natural nails as it can cause damage.
- Medium Grit (180-240): The most versatile for natural nail shaping and reducing length.
- Fine Grit (240+): For smoothing edges and finishing.
- Glass/Crystal Files: Highly recommended for natural nails. They file gently in both directions (though one direction is still generally preferred for strength), seal the nail edge, and prevent splitting and peeling. They are durable and hygienic.
- Metal Files: Generally discouraged for natural nails as they can be too harsh, cause friction, and lead to splitting. Best avoided.
- Emery Boards: Common and inexpensive. They come in various grits (coarseness).
- Nail Buffer: Used after filing to smooth the nail surface and buff out ridges, creating a glossy finish. They typically have multiple sides with different grits for filing, buffing, and shining.
- Cuticle Pusher (and Nippers, with Caution):
- Cuticle Pusher: Essential for gently pushing back cuticles, which makes the nail bed appear longer and provides a cleaner canvas for shaping. Use a metal or wooden pusher.
- Cuticle Nippers: Use only to trim hangnails or excess dead skin around the cuticle area. Never cut the cuticle itself, as it protects the nail matrix from infection. This tool requires precision and should be used sparingly or by a professional.
- Nail Brush: For cleaning under nails and removing filing dust.
- Nail Oil/Cream: Applied after shaping and buffing to moisturize nails and cuticles, promoting health and flexibility.
Step-by-Step General Shaping Techniques (The Golden Rules):
- Preparation is Key:
- Clean Nails: Ensure your nails are clean and free of polish.
- Dry or Damp? For most natural nails, it’s best to file when they are completely dry. Filing wet nails can make them more prone to tearing and splitting. However, some prefer to file slightly damp nails for very thick nails. For extensions, always file dry.
- Push Back Cuticles: Gently push back your cuticles to reveal the full nail bed and create a clean starting point.
- Clip First (if needed): If your nails are very long, use clippers to remove the bulk of the length before filing. Cut slightly longer than your desired final length to allow room for filing and shaping. Avoid cutting too much at once.
- File in One Direction (Mostly): This is a crucial rule for preventing splits and frayed edges on natural nails. File from the side towards the center, lifting the file with each stroke, rather than sawing back and forth. Glass files are more forgiving if you accidentally use a back-and-forth motion, but one-direction filing is still best practice.
- Angle Your File: The angle at which you hold the file determines the shape.
- For Square/Squoval: Hold the file perpendicular to the free edge (90 degrees) for the straight tip. For squoval, then gently round the corners.
- For Round/Oval/Almond: Angle the file slightly under the nail, following the desired curve.
- Achieve Symmetry: This is the hardest part.
- Work on Both Sides: File a bit on one side, then move to the other, constantly comparing to ensure symmetry.
- Check from Multiple Angles: Look at your nails from the top, from the side, and from the front (palm up) to ensure the shape is even and balanced.
- Don’t Rush: Take your time. It’s easier to remove more nail than to put it back.
Specific Shaping Tutorials (Brief Principles):
- Round: File the free edge following the natural curve of your fingertip. Keep the sides straight but gently rounded at the very tip.
- Oval: Start by rounding the sides of the nail, then file the free edge into a smooth, egg-like curve that tapers slightly.
- Square: Use straight-edge clippers to cut straight across. Then, using a medium-grit file, file straight across the free edge, holding the file perfectly perpendicular. Keep the side walls straight.
- Squoval: Follow the steps for Square, then gently round off the sharp corners with a fine-grit file, moving in a soft, sweeping motion.
- Almond: File the side walls to taper inwards towards the center, creating a soft point. The key is a gradual taper, not a sharp angle. Finish by gently rounding the very tip.
- Coffin/Ballerina: This almost always requires extensions. File the side walls to taper significantly, then use a straight file to create a blunt, flat tip.
Finishing Touches:
- Buffing: Use a multi-sided buffer to smooth the nail surface, remove any ridges, and create a natural shine. Follow the grits from coarse to fine.
- Clean Up: Use a nail brush to remove any dust.
- Moisturize: Apply cuticle oil or a rich hand cream to hydrate your nails and cuticles. This is crucial for healthy nail growth and appearance.
Mastering the art of shaping your fingernail shapes takes practice and patience. But with the right tools and a commitment to these precise techniques, you’ll be able to sculpt your nails like a pro, achieving a flawless finish that enhances your hands and reflects your personal style.
Beyond the Natural Nail: Enhancing Fingernail Shapes with Extensions
While natural nails can be beautiful, some of the more dramatic or elongated fingernail shapes simply aren’t achievable or sustainable without the aid of extensions. For individuals seeking extreme length, intricate designs, or a specific, bold silhouette like stiletto or coffin, nail extensions offer a transformative solution. This section delves into the world of nail enhancements, exploring the most popular types and their role in sculpting complex fingernail shapes, emphasizing the crucial role of a professional nail technician.
Nail extensions are artificial nail enhancements applied over your natural nails to add length, strength, and durability. They provide a robust canvas that can be sculpted into virtually any desired shape, often allowing for lengths and angles that natural nails could never maintain without breaking.
Popular Types of Nail Extensions for Shaping:
- Acrylic Nails:
- What they are: A liquid monomer and powdered polymer are mixed to create a hard protective layer over your natural nail. This mixture hardens rapidly when exposed to air.
- Pros for Shaping: Extremely durable and strong, making them ideal for creating very long, sharp, or intricate fingernail shapes like Stiletto, Coffin, and Lipstick. The material is robust enough to withstand significant filing and shaping.
- Cons: Can look thick if not applied by a skilled technician. The application process has a strong chemical odor. Can be damaging if improperly applied or removed.
- Maintenance: Requires fills every 2-3 weeks as your natural nail grows out. Professional removal is essential to prevent damage.
- Gel Nails (Hard Gel / Builder Gel):
- What they are: A gel-like substance is applied to the nail and then cured (hardened) under a UV or LED lamp. Hard gel is non-porous and cannot be soaked off. Builder gel is a type of hard gel used to build length and strength.
- Pros for Shaping: Offers a more flexible and natural-looking finish than acrylics, while still providing excellent strength for shaping. They are odorless during application. Can be sculpted into various fingernail shapes, including Almond, Oval, and even moderate Coffin/Stiletto. Builder gel is particularly good for creating strong apexes for longer shapes.
- Cons: Requires a UV/LED lamp for curing. Hard gel needs to be filed off for removal, which can be time-consuming.
- Maintenance: Requires fills every 2-3 weeks.
- Dip Powder Nails (SNS, NexGen, etc.):
- What they are: A system where a base coat is applied, the nail is dipped into a colored powder, and then sealed with an activator and top coat. It’s a hybrid between gel and acrylic.
- Pros for Shaping: Offers a strong, durable finish that is often thinner than traditional acrylics. Can be used to create various fingernail shapes, providing good strength for medium to long lengths. Application is odorless and typically faster than acrylics or gels.
- Cons: Can sometimes look bulky if too many layers are applied. Removal involves soaking, but can still be harsh if not done correctly.
- Maintenance: Requires fills or full removal and reapplication every 2-4 weeks.
The Crucial Role of a Professional Nail Technician:
While DIY shaping of natural nails is achievable, attempting complex fingernail shapes with extensions at home is highly discouraged. This is where a skilled, certified nail technician becomes indispensable.
- Expertise in Application: Professionals are trained in the precise application techniques for each type of extension, ensuring proper adhesion, preventing lifting, and minimizing damage to your natural nail.
- Sculpting Mastery: They possess the artistry and precision required to sculpt intricate shapes like Stiletto, Coffin, or Lipstick. They understand the ideal apex (the highest point of the nail’s curve, crucial for strength), sidewall construction, and tip definition for each shape. They can also account for your natural nail bed and finger anatomy to create the most flattering and durable extension.
- Hygiene and Safety: Professionals adhere to strict hygiene protocols, using sterilized tools and proper ventilation, which is vital for preventing infections.
- Damage Prevention: They know how to properly remove extensions without causing trauma to your natural nails, which is a common cause of damage when attempted at home.
- Customization: A good technician can customize the length, thickness, and specific nuances of any shape to perfectly suit your desires and lifestyle.
Maintenance and Removal of Extensions:
Regardless of the type, extensions require regular maintenance (fills) to keep them looking fresh and to prevent stress on your natural nail as it grows. Attempting to pick off or forcibly remove extensions at home can cause severe damage to your nail plate, leading to thinning, peeling, and weakness. Always seek professional removal to ensure your natural nails remain healthy.
In essence, while the allure of dramatic fingernail shapes is powerful, achieving them often necessitates the strength and versatility of extensions. Understanding the different types available and, crucially, entrusting their application and maintenance to a skilled professional, ensures not only stunning results but also the continued health and integrity of your natural nails.
The Psychology and Cultural Significance of Fingernail Shapes
Beyond their aesthetic appeal and practical function, fingernail shapes carry a fascinating psychological weight and cultural significance. They are not merely a matter of personal preference; they can subtly convey aspects of one’s personality, reflect societal trends, and even hold historical meaning. Understanding this deeper layer adds another dimension to the art of nail shaping.
1. Personality and Perception: What Your Nails Say About You
Our hands are constantly in motion, communicating through gestures, and our nails are an integral part of that visual language. The shape of your fingernails can subtly influence how others perceive you and even how you feel about yourself.
- Round/Oval: These shapes often convey a sense of gentleness, approachability, and classic femininity. They are seen as practical, down-to-earth, and reliable. Psychologically, choosing these shapes might indicate a preference for comfort, tradition, and a less overtly dramatic style.
- Square/Squoval: These shapes project an image of strength, confidence, and a modern, no-nonsense attitude. They suggest precision, organization, and a bold personality. Individuals drawn to these shapes might value structure, clarity, and a contemporary aesthetic.
- Almond: This shape is often associated with elegance, sophistication, and a refined taste. It speaks to a desire for grace and a chic, fashionable demeanor. Psychologically, it might reflect a person who values beauty, poise, and a touch of luxury.
- Coffin/Ballerina: These dramatic shapes signal boldness, trendiness, and a strong fashion sensibility. They convey a desire to stand out, an embrace of glamour, and an edgy personality. Choosing this shape might indicate confidence, a love for current trends, and a willingness to make a statement.
- Stiletto: The most extreme, Stiletto nails immediately communicate fierceness, daring, and an unapologetic sense of individuality. They are a power statement, often chosen by those who are unafraid to challenge norms and command attention. Psychologically, it might reflect a rebellious spirit, high confidence, or an artistic flair.
- Lipstick/Flare: These unconventional shapes suggest creativity, uniqueness, and a playful, experimental spirit. They are chosen by those who embrace individuality and enjoy breaking traditional molds.
2. Historical Context and Evolving Trends:
The popularity of different fingernail shapes has evolved significantly throughout history, often mirroring broader fashion trends and societal values.
- Early 20th Century (1920s-1940s): Short, rounded nails were the norm, reflecting practicality and a more conservative aesthetic. The “moon manicure” (leaving the lunula unpolished) was popular.
- Mid-20th Century (1950s-1960s): The Oval shape gained prominence, embodying classic Hollywood glamour and femininity. Longer, more sculpted nails became a symbol of leisure and sophistication.
- Late 20th Century (1970s-1990s): The Square and Squoval shapes rose to popularity, reflecting a shift towards more modern, strong, and sometimes minimalist aesthetics. The French manicure became iconic with these shapes.
- 21st Century (2000s-Present): The rise of nail art and social media has ushered in an era of unprecedented experimentation. While classic shapes remain, dramatic shapes like Almond, Coffin, and Stiletto have exploded in popularity, fueled by celebrity influence and the desire for self-expression. The ability to achieve extreme lengths and intricate designs with extensions has played a huge role in this diversification of fingernail shapes.
3. Cultural Influences:
Different cultures can have varying preferences and associations with fingernail shapes. For instance, while very long, dramatic shapes might be mainstream in Western celebrity culture, some Asian cultures might traditionally prefer shorter, more natural shapes for practicality and elegance. The influence of K-Pop and J-Pop on nail art and shapes, however, has also introduced more playful and intricate designs globally. In some cultures, long nails have historically been a symbol of status, indicating that one does not engage in manual labor.
4. Celebrity Influence and Social Media:
Celebrities and social media platforms like Instagram, TikTok, and Pinterest are powerful drivers of fingernail shapes trends. When an A-list celebrity sports a new, bold shape (like Kylie Jenner popularizing the Coffin nail), it can quickly become a global phenomenon. These platforms provide immediate visual inspiration and tutorials, making it easier for individuals to experiment and replicate trending shapes. The visual nature of nails makes them perfect for sharing and influencing.
5. Empowerment and Self-Expression:
Ultimately, the choice of fingernail shapes is a deeply personal form of self-expression. It’s a small canvas that allows individuals to reflect their mood, personality, and current aesthetic. For many, a beautifully shaped and manicured nail is a source of confidence and empowerment. It’s a way to feel polished, put-together, and in control of one’s image, contributing to overall well-being and self-esteem. The ability to transform your nails, whether subtly or dramatically, offers a creative outlet that can be incredibly satisfying.
In conclusion, fingernail shapes are far more than just a superficial detail. They are a fascinating intersection of personal style, cultural trends, and even psychological projection. By understanding the deeper meaning and impact of these shapes, you can make an even more informed and empowering choice for your own sculpted perfection.
Troubleshooting and Common Mistakes in Fingernail Shaping
Even with the right tools and a clear understanding of fingernail shapes, the journey to perfectly sculpted nails can encounter a few bumps. Common mistakes and challenges can lead to uneven results, breakage, or even nail damage. This section provides practical troubleshooting tips and solutions to help you overcome these hurdles, ensuring your shaping efforts are always successful and your nails remain healthy.
1. Uneven Shapes and Lack of Symmetry:
- Problem: One nail looks different from the others, or the shape isn’t symmetrical across the nail.
- Solution:
- Slow Down and Compare: Don’t rush. File a little on one side, then immediately switch to the other nail (or the other side of the same nail) and compare.
- Check from All Angles: Look at your nails from the top, from the sides (profile), and from the front (palm up). Often, asymmetry is only visible from certain angles.
- Use a Guide (Optional): For very precise shapes like Square or Coffin, some people use a piece of tape or a small ruler to ensure a perfectly straight edge, though this is more advanced.
- Focus on the Nail Bed: Remember that the free edge should ideally mirror the curve of your cuticle line or the natural shape of your nail bed for the most harmonious look.
2. Breaking, Splitting, or Peeling Nails After Shaping:
- Problem: Your nails become weak, split, or peel after you’ve shaped them.
- Solution:
- File in One Direction: This is the most crucial rule for natural nails. Sawing back and forth creates friction and frays the nail layers, leading to splitting. Always file from the side towards the center in one smooth stroke, lifting the file with each pass.
- Use the Right File Grit: Avoid coarse-grit files (below 180 grit) on natural nails. These are too abrasive and can cause micro-tears. Stick to medium (180-240) and fine (240+) grit files, or ideally, a glass/crystal file which seals the nail edge.
- File Dry (Mostly): While some prefer slightly damp, filing completely dry natural nails generally reduces the risk of tearing. Wet nails are softer and more pliable, making them more susceptible to damage from filing.
- Don’t Over-File the Sides: Aggressively filing the side walls of your nail can weaken the nail plate where it attaches to the nail bed, making it prone to breaking.
- Nail Strengtheners: If your nails are naturally weak, incorporate a good quality nail strengthener into your routine.
- Hydration: Keep your nails and cuticles moisturized with nail oil or cream. Flexible nails are less likely to break.
3. Over-Filing and Shortening Too Much:
- Problem: You accidentally file your nails shorter than intended, or the shape becomes too extreme.
- Solution:
- Clip Conservatively: If removing significant length, clip slightly longer than your desired final length. You can always file more, but you can’t add length back.
- File in Small Increments: Work slowly, removing tiny amounts of nail at a time.
- Step Away and Re-Evaluate: If you feel yourself getting frustrated or losing focus, take a break. Come back with fresh eyes.
4. Damage from Improper Tools:
- Problem: Using household scissors, dull clippers, or harsh metal files.
- Solution:
- Invest in Quality Nail Tools: Sharp, clean, and appropriate tools are essential. Dull clippers crush the nail, and metal files can be too abrasive.
- Sanitize Tools: Always clean your nail tools before and after use with rubbing alcohol to prevent bacterial or fungal infections.
5. Ignoring Your Natural Nail Bed:
- Problem: Trying to force a shape that fundamentally clashes with your natural nail bed or finger anatomy (e.g., a very sharp square on a very rounded nail bed, or a stiletto on very short fingers).
- Solution:
- Assess Your Natural Shape First: Understand the inherent width, length, and curve of your nail bed.
- Work With Your Natural Anatomy: While you can certainly alter your shape, trying to go against your natural grain too aggressively can lead to an unnatural look, frequent breakage, or the need for constant, high-maintenance extensions.
- Consult a Professional: A good nail technician will advise you on what shapes are most flattering and sustainable for your unique hands.
6. Cuticle Issues from Improper Care:
- Problem: Cutting cuticles, causing hangnails or infections.
- Solution:
- Never Cut Cuticles: The cuticle is a protective barrier. Only gently push them back after softening them (e.g., after a shower or with cuticle remover).
- Trim Hangnails Only: Use cuticle nippers only for hangnails or excess dead skin around the nail, never the live cuticle itself.
- Moisturize Cuticles: Regularly apply cuticle oil or cream to keep them soft and healthy, preventing dryness and hangnails.
By being aware of these common pitfalls and implementing these troubleshooting strategies, you can confidently navigate the world of fingernail shapes, ensuring your nails remain healthy, strong, and beautifully sculpted. Patience, precision, and proper tools are your best allies in achieving professional-level results at home.
Conclusion: Embrace Your Radiant Glow with the Best Self Tanning Lotion for Fair Skin
The journey to finding the best self tanning lotion for fair skin can often feel like a daunting one, filled with past disappointments of streaky, orange, or unnatural results. However, as we’ve explored, the beauty industry has made incredible strides, developing sophisticated formulations specifically tailored to the unique needs of lighter complexions. These innovative lotions offer a safe, effective, and beautifully natural alternative to sun exposure, allowing you to achieve that coveted sun-kissed radiance without any of the associated risks.
By understanding what makes these products superior – from their carefully calibrated DHA and erythrulose concentrations to